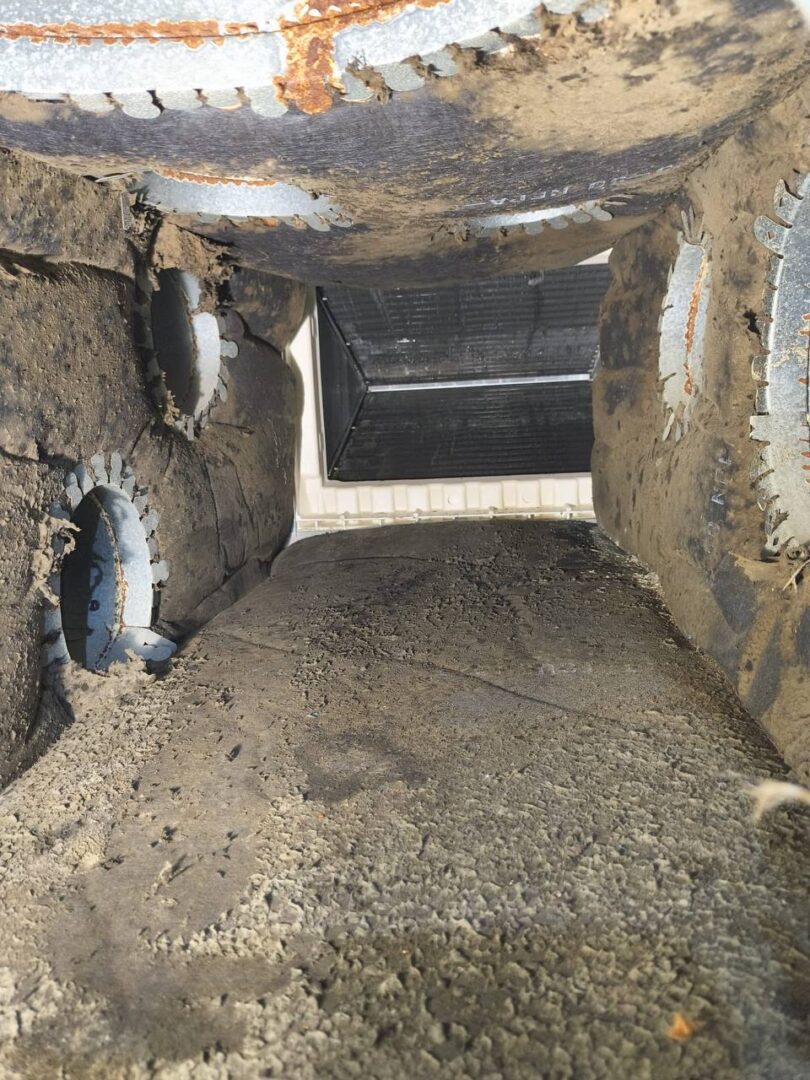
Air duct cleaning is one of the most discussed — and most misunderstood — services in the home maintenance world. Search the term and you will find everything from NADCA-endorsed standards to internet forum debates about whether it is even necessary. This guide cuts through the noise with a straightforward, evidence-based look at what air duct cleaning is, how the professional process works, what it does and does not accomplish, and how to evaluate whether your home’s HVAC system would benefit from it.
At its core, air duct cleaning is the professional, source-removal cleaning of a home’s entire HVAC air distribution system. That means physically extracting accumulated dust, pollen, pet dander, construction debris, and microbial growth from the ductwork and components — not masking it with chemicals, fragrances, or superficial quick-pass methods. According to NADCA (the National Air Duct Cleaners Association), proper source-removal cleaning uses mechanical agitation combined with HEPA-filtered negative air pressure to pull debris out of the system at its source, preventing it from recirculating into living spaces. For a deeper dive into the step-by-step methodology, see our guide on how air duct cleaning works.
What Air Duct Cleaning Actually Cleans
Many homeowners picture duct cleaning as simply vacuuming out the long metal or flexible tubes in the attic. A comprehensive NADCA-standard cleaning addresses eight distinct components of the HVAC air distribution system:
- Supply ductwork: The ducts that deliver conditioned air from the air handler to each room. These are under positive pressure and directly impact the air you breathe.
- Return ductwork: The ducts that pull room air back to the air handler. Returns operate under negative pressure and tend to accumulate the heaviest debris because they draw in unfiltered air from living spaces.
- Supply and return registers and grilles: The visible metal or plastic covers in each room — often the first place homeowners notice dust accumulation.
- Air handler compartment: The metal cabinet housing the blower motor, evaporator coil, and sometimes the heat exchanger. This is typically the most contaminated component because it sits downstream of the filter in the dirtiest air path.
- Evaporator coil: The cold, damp coil that removes heat and humidity. In humid climates like the Texas Gulf Coast, the evaporator coil is a condensation point where dust, mold spores, and microbial growth concentrate.
- Blower wheel and motor assembly: The fan that circulates air. Dust buildup on blower blades reduces airflow efficiency and can throw the blower wheel out of balance — leading to premature motor wear.
- Plenum boxes: The sheet metal transition boxes connecting the air handler to the main duct trunks. Common collection points for construction debris, especially in newer homes.
- Drain pan and condensate line: While not a duct component, the drain pan sits under the evaporator coil. Standing water, microbial slime, and clogs here directly affect indoor air quality.
For a complete breakdown of all eight components and why each matters, see our detailed HVAC components guide.
How Professional Air Duct Cleaning Works
The NADCA-standard source-removal process follows a structured sequence of steps designed to clean every component without blowing debris into living spaces. Here is what a professional air duct cleaning looks like from start to finish:
Step 1: Pre-Inspection
Before any equipment enters the home, the specialist inspects each component — supply registers, return grilles, the air handler cabinet, the evaporator coil, the blower, and accessible duct sections. Photos document baseline conditions so the homeowner can see the before-and-after difference. The inspection determines the scope of work and identifies any problem areas, such as microbial growth on the coil or rodent contamination in the returns.
Step 2: System Protection and Negative Air Setup
The HVAC system is turned off. Supply and return registers are covered or sealed temporarily to create a controlled airflow path. A high-powered HEPA-filtered vacuum unit — typically truck-mounted or a portable unit rated at 2,000 CFM or more — is connected to the main trunk line near the air handler via a large-diameter vacuum hose. This creates negative pressure throughout the duct system, meaning any debris dislodged during agitation is pulled toward the vacuum rather than pushed into rooms.
Step 3: Mechanical Agitation
Each duct branch is mechanically agitated to dislodge adhered debris from the duct walls. Tools vary by duct type and accessibility: rotary brushes for rigid metal ducts, compressed air whips for flexible ducts, and skipper balls for hard-to-reach sections. The agitation physically breaks the bond between debris and duct surfaces — no chemicals, no masking. The dislodged material is immediately captured by the negative air stream and pulled into the HEPA vacuum.
Step 4: Component Cleaning
Once the duct runs are clean, the specialist turns to the HVAC equipment itself. The air handler interior is HEPA-vacuumed, the evaporator coil is cleaned using coil-safe techniques, the blower wheel and housing are hand-cleaned to restore balance and airflow, and plenum boxes are inspected and cleared of construction debris. If microbial growth is present on non-porous surfaces, an EPA-registered antimicrobial treatment may be applied — but only after source removal has physically eliminated the underlying debris.
Step 5: Post-Cleaning Inspection
The specialist walks the homeowner through the results, showing before-and-after photos and confirming that all eight components have been addressed. This is also the moment to discuss any findings — like a damaged duct section, an undersized return, or a coil that should be monitored — that may warrant follow-up. A reputable provider documents everything.
The entire process typically takes 3 to 5 hours for an average single-family home, though larger homes or heavily contaminated systems may require a full day. Learn more about how long the results of air duct cleaning last and what maintenance schedule is appropriate for your home.
Signs Your Air Ducts May Need Cleaning
Not every home needs duct cleaning on the same schedule. The best indicator is a professional inspection, but homeowners should watch for these common signals:
- Visible dust blowing from supply registers when the HVAC system starts — you can see particulates entering the room air.
- Dark filtration lines or dust buildup around the edges of register covers and on the wall or ceiling surrounding them.
- Musty or stale odor that intensifies when the blower turns on, suggesting microbial activity in the air handler or on the evaporator coil.
- Uneven airflow between rooms — some rooms stay stuffy or fail to reach the thermostat set point while others are comfortable.
- Excessive dust settling on surfaces within 24 to 48 hours of cleaning the house, indicating the HVAC system is recirculating particulates faster than normal household dust accumulation.
- Recent renovation or construction — drywall dust, sawdust, and insulation fibers inevitably enter the duct system during remodeling and should be removed before the system is used heavily.
- Evidence of rodent or pest activity in the ductwork — droppings, nesting material, or odors indicate contamination that requires professional remediation.
- Increased allergy or respiratory symptoms that are noticeably worse indoors and improve when away from home for several hours.
If you recognize several of these signs, the next logical step is a free professional inspection. A NADCA-certified specialist can show you exactly what is inside your ducts — with photos — so you can make an informed decision. See our guide on how to tell if your air ducts need cleaning for more detail.
Residential vs. Commercial Air Duct Cleaning
While the core source-removal methodology is the same, residential and commercial air duct cleaning differ in several important ways that homeowners should understand:
- System scale: Residential systems typically handle 1 to 5 tons of cooling with ductwork confined to a single structure. Commercial systems can handle 50 to 500+ tons across multiple zones and buildings.
- Duct material: Most residential ductwork is flexible (flex duct) or light-gauge rigid metal in attics and crawl spaces. Commercial systems often use heavy-gauge galvanized steel, duct board, or spiral duct in exposed ceiling plenums.
- Access points: Residential systems are typically accessed through the attic, a closet, or the garage. Commercial systems require access through ceiling tiles, mechanical rooms, or rooftop units.
- Air volume: Residential cleaning equipment is sized for 1,200 to 2,000 CFM. Commercial cleaning requires equipment rated at 5,000 to 15,000+ CFM and often involves negative air machines staged throughout the building.
- Scheduling: Residential cleaning is scheduled around homeowner availability, typically on weekdays during business hours. Commercial cleaning is often performed after hours, on weekends, or during scheduled shutdowns to avoid disrupting business operations.
- Regulatory oversight: Commercial duct cleaning — particularly in healthcare, food processing, and manufacturing facilities — may be subject to OSHA, ASHRAE, or industry-specific standards beyond NADCA. Residential cleaning operates under NADCA standards with no additional federal mandate.
For homeowners, the key takeaway is that residential duct cleaning is a controlled, contained process designed around occupied living spaces. For a full comparison, see our residential air duct cleaning guide.
DIY vs. Professional Air Duct Cleaning
It is tempting to view air duct cleaning as a DIY project — after all, it involves cleaning things, and homeowners clean things. However, the gap between a consumer-grade shop vacuum and NADCA-standard source-removal equipment is substantial:
- Reach: Most residential duct runs extend 10 to 40 feet from the main trunk. A shop vacuum hose cannot reach more than a few feet past the register opening. The deep ductwork — where most debris accumulates — remains untouched.
- Agitation: Household vacuums rely on suction alone. Debris that has adhered to duct walls over years of heating and cooling cycles — often baked on by the heat exchanger — requires mechanical agitation (rotary brushes, compressed air) to dislodge.
- Containment: Professional cleaning uses negative air pressure to ensure dislodged debris is captured at the source. A DIY attempt with a shop vacuum can actually push debris further into the system or aerosolize it into living spaces.
- Component access: The evaporator coil, blower assembly, and air handler interior require disassembly for proper cleaning. These are not accessible through a register opening.
- Verification: A professional documents the condition before and after. A DIY attempt provides no documentation and no way to confirm anything was actually accomplished beyond the first 3 feet of visible duct.
For more on this topic, read our comparison: Can I clean my air ducts myself?
How to Choose an Air Duct Cleaning Provider
Selecting a provider is the single most important decision in the air duct cleaning process. A NADCA-certified company using source-removal methodology produces measurably cleaner ducts. A non-certified operator using a shop vacuum and a sales pitch may leave ducts dirtier than before — or worse, create damage. Here are the five criteria that matter:
1. NADCA Certification (Non-Negotiable)
NADCA — the National Air Duct Cleaners Association — publishes the industry standard (the ACR, or Assessment, Cleaning, and Restoration standard) that defines what constitutes a proper cleaning. A NADCA-certified firm employs at least one Air Systems Cleaning Specialist (ASCS) who has passed the association’s examination and maintains continuing education credits. Verify certification at NADCA.com — do not take a company’s word for it.
2. Source-Removal Methodology
Ask the provider to describe their cleaning process in detail. The answer should include the phrase “source removal” and describe mechanical agitation combined with HEPA-filtered negative air extraction. Be wary of providers who emphasize chemical treatments, antimicrobial fogging, or deodorizers as the primary cleaning method — chemicals cannot substitute for physical debris removal.
3. Transparent Scope and Documentation
A legitimate provider should be able to tell you exactly which components will be cleaned (all eight listed above), approximately how long the job will take, and what before-and-after documentation you will receive. Vague answers or promises of a “quick clean” in under an hour are red flags for a NADCA-standard job.
4. Real References and Reviews
Look for reviews that mention specific details — the technician’s name, the components cleaned, the before-and-after experience — rather than generic “great service” one-liners. Google Maps reviews, in particular, tend to be harder to manipulate than platform-specific review systems.
5. Free, No-Obligation Inspection
A reputable NADCA-certified provider offers a free inspection so you can see what is in your ducts before committing. The inspection should include photos and a clear explanation of what needs attention and why. If a company pressures you to book cleaning before inspecting, move on. For a deeper guide on provider selection, see our article on how to choose an air duct cleaning company.
Air Duct Cleaning in Humid Climates: Texas and Louisiana
Climate matters for air duct cleaning frequency and urgency. In the humid subtropical climate of the Texas Gulf Coast and South Louisiana, the evaporator coil operates in a near-constant state of condensation for 7 to 9 months of the year. This persistent moisture, combined with the organic dust load that coastal air carries, creates an environment where microbial growth on the coil and in the air handler is not a possibility — it is an expectation. Homes in Houston, Austin, San Antonio, Baton Rouge, and New Orleans typically benefit from cleaning on the shorter end of the 3-to-5-year NADCA range.
For Houston-area homeowners specifically, see our Houston air duct cleaning hub for market-specific guidance. Austin homeowners can reference air duct cleaning in Austin. South Louisiana residents should review our South Louisiana service page.
Frequently Asked Questions About Air Duct Cleaning
Q: Does air duct cleaning really make a difference?
Yes, when performed to NADCA source-removal standards. Independent research — including a 2014 study published in the journal Indoor Air — has documented measurable reductions in airborne particulate matter following professional duct cleaning. The key qualifier is “professional.” A superficial clean that addresses only the first few feet of visible ductwork will not produce meaningful results.
Q: Will air duct cleaning reduce my energy bills?
Potentially. A clean evaporator coil and blower wheel can improve HVAC system efficiency by 5 to 15 percent, depending on the degree of fouling before cleaning. However, duct cleaning should be evaluated primarily on its indoor air quality benefits, not as an energy-savings investment with a guaranteed payback period.
Q: Can air duct cleaning damage my ducts?
Not if performed by a trained NADCA-certified professional using appropriate tools for your duct type. Flexible ductwork requires different agitation techniques than rigid metal. A qualified technician knows the difference. Damage is almost always the result of inexperience, improper equipment, or both.
Q: Is there anything I should do before the cleaning appointment?
Clear access to all registers and the air handler. Move furniture and belongings away from wall and floor registers. Plan for the HVAC system to be off for the duration (a few hours). If you have pets, secure them in an area away from the work zone. The provider will handle everything else.
Q: How do I maintain clean ducts between professional cleanings?
Change your HVAC filter regularly — every 30 to 90 days depending on the filter MERV rating and household conditions (pets, construction, occupants). Use the highest MERV filter your system is rated for. Vacuum registers and grilles when you clean each room. Keep return air pathways clear of furniture and obstructions. And schedule a professional inspection every 2 to 3 years to monitor condition.
Next step: If you have never had a professional air duct inspection — or if it has been more than 3 years — schedule a free, no-obligation assessment with a NADCA-certified indoor air specialist. You will see exactly what is inside your ducts, with photos, before making any decisions. Contact AH-CHOO to book your free inspection. Serving Houston, Austin, San Antonio, and South Louisiana.
Related AH-CHOO resources: commercial air duct cleaning.